This cheat sheet is for dot net programmers (C# and VB.Net). Here you can compare the syntax of two programming language the C#.Net and VB.Net. I got this from ASP alliance and now I will share it to you. Just download the PDF file.
Note: mav Geek’s does not store or upload file to this website. We upload files to other file sharing website such as Rapidshare.com, Have a nice stay here.
Download file included all these below videos. You can find more videos by check the home page. I pack in one rar file and split to 46 part, you must download all of them and then use WinRAR to join and extract it.
Password: @netonline Size when finished download: 4.27 GB
Please don't ask me upload some file for you. I don't have time to upload it. Download all of them and UnRAR it. All download link post here.
This software will help you convert your VB.Net code to C#.Net code, very interesting software, made for VB.Net programmers to help them convert their VB.Net code to C#.Net code. We have online and offline version of this converter.
Note: mav Geek’s does not store or upload file to this website. We upload files to other file sharing website such as Rapidshare.com, Have a nice stay here.
This image below is another sample of modified mirror effect. Create your mirror effect in Adobe Photoshop in a few minutes. This tutorial, we will use text then we apply a mirror for the text, this is very easy to do, just follow the instructions below, and I assume you have a basic knowledge of navigating to the IDE of Adobe Photoshop.
Step 1: Open Adobe Photoshop software installed from your computer.
Step 2: Go to menu File -> New then a new window will appear, the new window set the width to 400 pixels and set the height to 200 pixels and set the background contents to white and last the resolution value to 72 then click OK button.
Step 3: Go to the toolbox and select the type tool the symbol is T, “capital letter T”, select it then click to the work area, the white space. In this tutorial I will use my first name and you are free to experiment to this tutorial, e. g. use your own name, Tom, Jerry, Samurai, or what… Okay I will use my name “Mark”, and then after you type any text name go to the toolbox and select the move tool, the move tool will help you to move text or layer in your work area, move your text to the center of the work area.
Step 4: Then go to the layers window and duplicate the layer, the layer with the name you type, the layer name in my example since earlier I type Mark, the layer will also named Mark, select the layer and hit Ctrl + J in your keyboard, if you notice there’s another layer appear from the layers window named “Mark Copy”.
Step 5: Select the layer named “Mark Copy” hold mouse left button then drag the layer down to the layer named “Mark” then release the left mouse button, next make sure you still select the layer named “Mark Copy” then hit Ctrl + T in your keyboard. If you notice to the work area there’s a box with the point, move your mouse inside the box then right click and select “Flip Vertical” and hit enter from your keyboard.
Step 6: Select the layer with the name “Mark Copy” and press arrow down from your keyboard, compare your work from image below.
Step 7: then follow the following image with instructions below;
Step 8: Change the “Mark Copy’s Layer” Opacity value to 60%.
And now you’re done, final output below, and you can modify you’re layout, just like mine from the above image, the mav Geek.
Hope you enjoy this tutorial. Thank you for your time.
1. Bigupload File Size Limit: 2000MB Download Limit: Unlimited File Life: 30 Days (Deleted only if there is no download activity in 30 days) URL: http://www.bigupload.com
2. Content-Type File Size Limit: 100MB Download Limit: Unlimited File Life: 7 Days after last download URL: URL: http://www.content-type.com
3. CyberUpload File Size Limit: 500MB Download Limit: Unlimited File Life: 7 Days (Deleted only if there is no download activity in 7 days) URL: http://www.cyberupload.com
4. FileFactory File Size Limit: 500MB Download Limit: Unlimited File Life: 15 Days (Deleted only if there is no download activity in 15 days) URL: http://www.filefactory.com
5. MegaShares File Size Limit: 1.5GB Download Limit: Unlimited File Life: 25 Days (Deleted only if there is no download activity in 25 days) URL: http://www.megashares.com
6. mooload File Size Limit: 500MB Download Limit: Unlimited File Life: 30 Days (Deleted only if there is no download activity in 30 days) URL: http://www.mooload.com
7. RapidUpload File Size Limit: 300MB Download Limit: Unlimited File Life: 30 Days (Deleted only if there is no download activity in 30 days) URL: http://www.rapidupload.com
8. RapidShare File Size Limit: 100MB Download Limit: Unlimited File Life: 30 Days (Deleted only if there is no download activity in 30 days) URL: http://www.rapidshare.de
9. SendSpace File Size Limit: 1.2GB Download Limit: download bandwidth limit of 100GB File Life: 14 Days (Deleted only if there is no download activity in 14 days) URL: http://www.sendspace.com
10. SendOver File Size Limit: 2GB Download Limit: Unlimited File Life: 7 Days (Deleted only if there is no download activity in 7 days) URL: http://www.sendover.com
14. Uploading File Size Limit: 500MB Download Limit: Unlimited File Life: 30 Days (Deleted only if there is no download activity in 30 days) URL: http://www.uploading.com
16. zUpload File Size Limit: 500MB Download Limit: Unlimited File Life: 30 Days (Deleted only if there is no download activity in 30 days) URL: http://www.zupload.com
17. myShareBox File Size Limit: 100MB Download Limit: Unlimited File Life: 30 Days (Deleted only if there is no download activity in 30 days) URL: http://www.mysharebox.com
19. MegaUpload File Size Limit: 250MB Download Limit: Unlimited File Life: 30 Days (Deleted only if there is no download activity in 30 days) URL: http://www.megaupload.com
23. XtraFile File Size Limit: 250MB Download Limit: Unlimited File Life: 15 Days (Deleted only if there is no download activity in 15 days) URL: http://www.xtrafile.com
28. zSHARE File Size Limit: 100MB Download Limit: Unlimited File Life: 10 Days (Deleted only if there is no download activity in 10 days) URL: http://zshare.net
30. Store and Serve File Size Limit: 100MB Download Limit: Unlimited File Life: 30 Days (Deleted only if there is no download activity in 30 days) URL: http://storeandserve.com
and up to 116 sites, download the pdf file below:
wow, did you know this or I missing host ? Please comment my missing host, and I update it later......
Note: mav Geek’s does not store or upload file to this website. We upload files to other file sharing website such as Rapidshare.com, Have a nice stay here.
You’re the man! LOL!... this Adobe Photoshop template are free to download, the template is in PSD format, in order to use the template you must have a Adobe Photoshop software (any versions), Adobe Photoshop is a software that helps you edit pictures, create icon design, website templates, animated GIF’s, wallpapers and a lot more, if you’re a layout artist this software is good for you, easy to use software and most of all one of the most up to date software from the market, thank you to ADOBE they developed a good and a lot of powerful software.
The template is ready to use, just open your Adobe Photoshop software in your computer and open your desired template to use. Then edit your picture to suite your desired template. LOL! If you see the picture above, you will see the example model who dresses with the template. This template in order to produce a good output, you must have basic knowledge of navigating the software (Adobe Photoshop). So have fun, hope this will help you, good luck!
Note: mav Geek’s does not store or upload file to this website. We upload files to other file sharing website such as Rapidshare.com, Have a nice stay here.
This tutorial applicable to Visual Studio.Net 2008 full suite or if you have a Microsoft Visual Basic.Net 2008 express editions and Visual C#.Net 2008 express editions, it’s a computer programming tutorial but you will not do coding here, we will concentrate to the design and create a design using the IDE (short for integrated development environment) of the software I mention before. Now beautify your windows forms using background image of the windows form and the form’s icon of the windows forms, before that you need to download our resources files for this tutorial, follow the steps below;
Step 1: Unzip or unrar the file you’ve just downloaded using software such as WinRAR or WinZip.
Step 2: Open you Visual Studio.Net software full suite or the express editions, for this example I will usemy Visual C#.Net express edition.
Step 3: Create a new project (for this tutorial we will create a search form), name your project mavGeek Search Form, then press OK button.
Step 4: Click the form from your software IDE, then look to properties of the form.
Step 5: Then change the following values from the properties window of the form;
StartPosition: CenterScreen
Text: mavGeek Search Form
Size: 316, 185
Icon: browse the icon file from the resources file you downloaded earlier, filename = find, then select the file and click OK button to change it.
BackgroundImage: browse and import the image file from the resource you downloaded earlier, filename = bg, then select the file and click OK button to change it.
MinimizeBox: False
MaximizeBox: False
Step 6: Add new few control to a form, in my example I will add textbox and a button, then modify the text property of the button to value FIND.
And were done…
My output image below;
Notice the background image of the form and the magnifying icon in the title bar looks gorgeous…
Note: mav Geek’s does not store or upload file to this website. We upload files to other file sharing website such as Rapidshare.com, Have a nice stay here.
Good news fellow geeks; Microsoft delivers new wave of technologies to help businesses thrive in today’s Economy, the most awaited Microsoft Windows 7. Finally been given a more precise release date for Windows 7, the next operating system come from Microsoft. Word comes from a PressPass article from Microsoft website, and while it may be vague, it’s official still.
Bill Veghte, the senior vice president of the Windows Business at Microsoft, stated, “With early RC testing and extensive partner feedback we’ve received, Windows 7 is tracking well for holiday availability.” The same with the Acer’s prediction (or maybe more that) that Microsoft Windows 7 will hit shelves October 23rd, but it was pretty widely accepted that we’ll see the new operating system (OS) by the end of the year anyway. Who knows, but it very well could be.
Below paragraph from Microsoft website;
LOS ANGELES — May 11, 2009 — Microsoft Tech•Ed North America 2009 kicked off today with announcements of new technologies that enable IT professionals and developers to help their organizations save money and improve efficiencies during difficult economic times. As part of today’s news, Microsoft Corp. announced that the company is anticipating that the next version of its client operating system, Windows 7, will be available to customers in time for the holiday shopping season. In addition, Windows Server 2008 R2 Release Candidate (RC) is available today with the final product releasing to market in the same timeframe as Windows 7.
Choose image or picture to your phone memory card then download it using Bluetooth or any device you want to use to a PC (Microsoft windows) or MAC (Apple OS) with Adobe Photoshop software and a printer with a capability to print colored pictures. Next open the Adobe Photoshop (any versions) then go to menu bar and choose File -> Open or you can do keyboard shortcut Ctrl + O then a new window will appear, the Open window then find the image or picture file you download from your mobile phone and select the file then click Open button. Notice the Adobe Photoshop environment you will see the picture you open, now were going to edit or modify the quality of the image file so that we can print it like high quality pictures produce by KODAK shops, okay lets modify the image file.
LOL this is very easy… 2 steps only…
Step 1: Go to the menu bar then choose Image -> Image Size then Image Size window will appear.
Step 2: From the Image Size window Find the Resolution: field under the Height: field then change the values to 1024 or higher, for now input only 1024 and make sure pixels/inch from the drop down menu and Click OK button.
Next save your work, go to menu bar and choose File -> Save As write any file name you want for the picture file you modify and make sure the format is JPEG, if not find it to the drop down menu and your ready to print, try to print to get a sample result of your work.
This software called ZoomIt version 3.03 developed by Mark Russinovich and published last March 30, 2009. ZoomIt version 3.03 is a free to use. Imagine you can now have a tool for your technical presentations without spending a lot of money to buy a Tablet PC. Using this software is very easy, all you need to have is a keyboard and a mouse, mouse is your pen for you to draw, and the keyboard are your friend to do a shortcut key command, example you want to change the color of your pen by pressing a single letter on a keyboard like R = red, B = blue, G = green, Y = yellow and a lot more color you can use.
Zoom After toggling ZoomIt you can zoom in with the mouse wheel or up and down arrow keys. Exit zoom mode with Escape or by pressing the right mouse button.
LiveZoom LiveZom mode is supported on Windows Vista and higher where updates show while zoomed. Note Zoom has a number of limitations: drawing and typing are not supported, and you must use Ctrl+Up and Ctrl+Down to control the zoom level.
Draw Once zoomed, toggle drawing mode by pressing the left mouse button. Erase the last entry with Ctrl+Z and all the drawing by pressing ‘e’. Center the cursor with the space bar. Exit drawing mode by pressing the right mouse button.
Break Enter timer mode by using the ZoomIt tray icon’s Break menu item. Increase and decrease time with the arrowkeys.
For more detail information download the software and use it, when you open the software there’s a lot of information you can see.
Note: mav Geek’s does not store or upload file to this website. We upload files to other file sharing website such as Rapidshare.com, Have a nice stay here.
Are you a web developer? Web designer? Well this Search Engine is for you, this is very easy for big benefits, just read the scenario and does the instructions and you’re done.
Scenario and instructions
In reality most of web developer and web designer use the HOME to link in there default page (e.g. index.htm/ index.html/ default.asp/ default.aspx/ filename.[jsp] or [php].) from their web directory. And I will also show you an example menu link, refer the below example.
1.) HOME ABOUT US SERVICES CONTACT US
2.) Home About Us Services Contact Us
Now you notice your previous work if you’re a web developer or web designer.
So here a great change for the HOME Home link, instead of home for your website page index, you can use your website name, example for this www.mavgeek.info [title of web site mav Geek],
Sample link [see the bold text]
Before: Home Services About Contact
After: mav Geek Services About Contact
Really easy right, SEO can help your website to index any of the popular search engine website like Google, Yahoo, and others. Imagine if you’re using Home link then a lot of web developer and designer and own a website, then you use the Home text link to your 100 pages, let’s say 1,000++ website using the text link with the ( Home Services About Contact ) and now Google will now think that your website and other website is all about Home. If you see the about example with mav Geek site, use use something descriptive, something related to my website. Instead of Home I use mav Geek, that simple.
The mav Geek website will give you IT news giving the information technology updates, computer tutorials such as computer programming catering basic and advance topics using the latest language like Visual C#.Net, Visual Basic.Net, ASP.Net, Cascading Style Sheets (CSS), Database programming like ADO.Net, LINQ, SQL, Desktop publishing using Adobe Photoshop and Website Layout Tutorial. We also give links where you can download latest software on the market. Well not just link but we also give you the opportunity to download our resources such as computer icons, wallpapers, e books and a lot more.
Hope you will enjoy your stay here in mav Geek’s because we will work hard to give you the best and free IT news, Computer Tutorials, and the best downloads just for the benefit of you.
This tutorial will gives you an idea how to make web 2.0 text design. This is so easy to create from the scratch hope you will enjoy this tutorial ok let’s start the tutorial by the following step by step guide.
Note: I used Adobe Photoshop CS4, and it’s ok to use other version of Adobe Photoshop, and after opening the Adobe Photoshop hit the keyboard letter D to restore or reset the Photoshop defaults.
First Open Adobe Photoshop from your computer. Then click File -> and select New (or you can use keyboard shortcut Ctrl+N), and then a new window will appear, from the new window set the width and the height for this tutorial, set the height 500 pixels and width for 500 pixels. See image below.
Then click OK button. The second step, select the TYPE tool from the Tools menu.
After selecting the Type tool from the toolbox, click to the white space or to the work space of the Adobe Photoshop then write the desire text you want. Just for example I will write mav Geek.
Next go to menu and select Layer -> Layer Style -> Gradient Overlay.
Then new window will appear the Layer Style window.
Then click the Gradient box the box with the black to the white color. And a new window will appear the Gradient Editor window.
Then follow the following settings from the image below:
Make sure you see the small white circle inside the red scope. Then click ok button.
Next:
And now click OK button then you will see the result of the Gradient Editor window.
Next click OK button and make sure will not click the OK button of the Layer Style window, see below and follow the instructions.
And then click OK button of the Layer Style window. See below the result
WOW! Looks great, almost done for this tutorial. Okay let’s continue.
Press the letter D in the keyboard, and now create a new layer, Go to the menu and choose Layer -> New -> Layer or you can do a keyboard shortcut Shift + Ctrl + N.
Make sure the new layer is selected, Highlighted with the color blue. And then hold Ctrl from the keyboard then mouse left click the mav Geek layer.
Then select the MOVE tool from the toolbox.
After selecting the MOVE tool follow the guide below.
Next:
The Result, see below.And now select the Gradient tool. Hold mouse left button to see the selection if necessary.
After selecting the Gradient tool from the toolbox, follow the following steps.
After that a menu will appear,
After that, follow the next step.
Press Ctrl + D, a keyboard shortcut to deselect the marquee. And now you will see result below, almost done.
Okay now we will finalize this one, the image result from above. Follow the final step.
From the Layers window select the layer named Layer 1 and follows the setting below.
And were done, see the final result below.
Thank you for your time reading, for following this tutorial. Promise more to come.
This tutorial is very simple to follow, just follow some simple steps and you’re done.
Let’s start, first you need to open Adobe Photoshop any version. For this tutorial I will use Adobe Photoshop CS4. After opening Adobe Photoshop create a new project, its easy go to the menu then choose File -> New or you can use a keyboard shortcut Ctrl + N. There’s a new window will appear just click OK button.
Next follow the instructions,
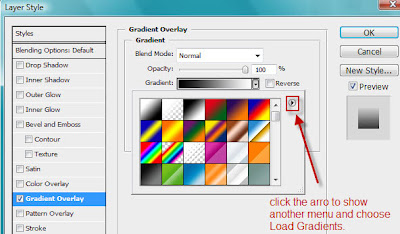
Then go to the menu and choose Layer -> Layer Style -> Gradients Overlay, and new window will appear (Layer Style Window).
After you select the Load Gradients on the above image a new window will appear, The Load window the window will allow you to browse the gradient file you need to load, or the gradient file from your hard drive. After selecting a gradient file and click ok. Then you’re done.
Just in case you need a gradient file, you can download it below.
Web 2.0 Gradients for Adobe Photoshop (All versions supported). Para ni sa inyo ni, para mahimo mong mas productive sa photoshop unta makatabang ni ninyo og sakto. I hope kabalo na mo mogamit ani og pag butang or pag settings sa photoshop nga software.
E download n lang ninyo, e click lang ang link sa ilamom and e unrar lang, then input the password.
Note: mav Geek’s does not store or upload file to this website. We upload files to other file sharing website such as Rapidshare.com, Have a nice stay here.
Sams Teach Yourself Visaul C#.Net 2008 in 24 Hours if free ebook to download. Libre kaayo ni! para ni sa tanan n gusto mag learn of Microsoft Visual C#.Net na computer programming language. If starter lang ka, gwapo ni na libro para ma guide ka kung unsa ba jud ning capability ani na computer language. So good luck sa imoha. E download lang using link below.
Hour 1 Jumping In with Both Feet: A Visual C# 2008 Programming Tour Hour 2 Navigating Visual C# 2008 Hour 3 Understanding Objects and Hour 4 Understanding Events Hour 5 Building Forms—The Hour 6 Building Forms—Advanced Techniques Hour 7 Working with Traditional Controls Hour 8 Using Advanced Controls Hour 9 Adding Menus and Toolbars to Forms Hour 10 Creating and Calling Methods Hour 11 Using Constants, Data Types, Variables, and Arrays Hour 12 Performing Arithmetic, String Manipulation, and Date/TimeAdjustments Hour 13 Making Decisions in Visual C# Code Hour 14 Looping for Efficiency Hour 15 Debugging Your Code Hour 16 Designing Objects Using Classes Hour 17 Interacting with Users Hour 18 Working with Graphics Hour 19 Performing File Operations Hour 20 Working with Text Files and the Registry Hour 21 Working with a Database Hour 22 Controlling Other Applications Using Automation Hour 23 Deploying Applications Hour 24 The 10,000-Foot View
Note: mav Geek’s does not store or upload file to this website. We upload files to other file sharing website such as Rapidshare.com, Have a nice stay here.