mav Geek

Information Technology News, Computer Tutorials, Software Updates, Tips and a lot of Downloads.

Bookmark mav Geek

Categories

Business Opportunity

PC and HDD

Showing posts with label Adobe Photoshop. Show all posts

This image below is another sample of modified mirror effect.
Create your mirror effect in Adobe Photoshop in a few minutes. This tutorial, we will use text then we apply a mirror for the text, this is very easy to do, just follow the instructions below, and I assume you have a basic knowledge of navigating to the IDE of Adobe Photoshop.

Step 1: Open Adobe Photoshop software installed from your computer.

Step 2: Go to menu File -> New then a new window will appear, the new window set the width to 400 pixels and set the height to 200 pixels and set the background contents to white and last the resolution value to 72 then click OK button.

Step 3: Go to the toolbox and select the type tool the symbol is T, “capital letter T”, select it then click to the work area, the white space. In this tutorial I will use my first name and you are free to experiment to this tutorial, e. g. use your own name, Tom, Jerry, Samurai, or what… Okay I will use my name “Mark”, and then after you type any text name go to the toolbox and select the move tool, the move tool will help you to move text or layer in your work area, move your text to the center of the work area.

Step 4: Then go to the layers window and duplicate the layer, the layer with the name you type, the layer name in my example since earlier I type Mark, the layer will also named Mark, select the layer and hit Ctrl + J in your keyboard, if you notice there’s another layer appear from the layers window named “Mark Copy”.

Step 5: Select the layer named “Mark Copy” hold mouse left button then drag the layer down to the layer named “Mark” then release the left mouse button, next make sure you still select the layer named “Mark Copy” then hit Ctrl + T in your keyboard. If you notice to the work area there’s a box with the point, move your mouse inside the box then right click and select “Flip Vertical” and hit enter from your keyboard.

Step 6: Select the layer with the name “Mark Copy” and press arrow down from your keyboard, compare your work from image below.

Step 7: then follow the following image with instructions below;


Step 8: Change the “Mark Copy’s Layer” Opacity value to 60%.

And now you’re done, final output below, and you can modify you’re layout, just like mine from the above image, the mav Geek.
Hope you enjoy this tutorial.
Thank you for your time.


You’re the man! LOL!... this Adobe Photoshop template are free to download, the template is in PSD format, in order to use the template you must have a Adobe Photoshop software (any versions), Adobe Photoshop is a software that helps you edit pictures, create icon design, website templates, animated GIF’s, wallpapers and a lot more, if you’re a layout artist this software is good for you, easy to use software and most of all one of the most up to date software from the market, thank you to ADOBE they developed a good and a lot of powerful software.

The template is ready to use, just open your Adobe Photoshop software in your computer and open your desired template to use. Then edit your picture to suite your desired template. LOL! If you see the picture above, you will see the example model who dresses with the template. This template in order to produce a good output, you must have basic knowledge of navigating the software (Adobe Photoshop). So have fun, hope this will help you, good luck!

Download here: Download Link 1
Password: www.mavgeek.info

Note: mav Geek’s does not store or upload file to this website. We upload files to other file sharing website such as Rapidshare.com, Have a nice stay here.

mav Geek Administrator


Choose image or picture to your phone memory card then download it using Bluetooth or any device you want to use to a PC (Microsoft windows) or MAC (Apple OS) with Adobe Photoshop software and a printer with a capability to print colored pictures. Next open the Adobe Photoshop (any versions) then go to menu bar and choose File -> Open or you can do keyboard shortcut Ctrl + O then a new window will appear, the Open window then find the image or picture file you download from your mobile phone and select the file then click Open button. Notice the Adobe Photoshop environment you will see the picture you open, now were going to edit or modify the quality of the image file so that we can print it like high quality pictures produce by KODAK shops, okay lets modify the image file.

LOL this is very easy… 2 steps only…

Step 1: Go to the menu bar then choose Image -> Image Size then Image Size window will appear.

Step 2: From the Image Size window Find the Resolution: field under the Height: field then change the values to 1024 or higher, for now input only 1024 and make sure pixels/inch from the drop down menu and Click OK button.

Next save your work, go to menu bar and choose File -> Save As write any file name you want for the picture file you modify and make sure the format is JPEG, if not find it to the drop down menu and your ready to print, try to print to get a sample result of your work.

This tutorial will gives you an idea how to make web 2.0 text design. This is so easy to create from the scratch hope you will enjoy this tutorial ok let’s start the tutorial by the following step by step guide.

Note: I used Adobe Photoshop CS4, and it’s ok to use other version of Adobe Photoshop, and after opening the Adobe Photoshop hit the keyboard letter D to restore or reset the Photoshop defaults.

First Open Adobe Photoshop from your computer. Then click File -> and select New (or you can use keyboard shortcut Ctrl+N), and then a new window will appear, from the new window set the width and the height for this tutorial, set the height 500 pixels and width for 500 pixels. See image below.

Then click OK button.
The second step, select the TYPE tool from the Tools menu.


After selecting the Type tool from the toolbox, click to the white space or to the work space of the Adobe Photoshop then write the desire text you want. Just for example I will write mav Geek.
Next go to menu and select Layer -> Layer Style -> Gradient Overlay.

Then new window will appear the Layer Style window.

Then click the Gradient box the box with the black to the white color. And a new window will appear the Gradient Editor window.


Then follow the following settings from the image below:


Make sure you see the small white circle inside the red scope. Then click ok button.

Next:


And now click OK button then you will see the result of the Gradient Editor window.


Next click OK button and make sure will not click the OK button of the Layer Style window, see below and follow the instructions.


And then click OK button of the Layer Style window. See below the result
WOW! Looks great, almost done for this tutorial. Okay let’s continue.

Press the letter D in the keyboard, and now create a new layer, Go to the menu and choose Layer -> New -> Layer or you can do a keyboard shortcut Shift + Ctrl + N.


Make sure the new layer is selected, Highlighted with the color blue. And then hold Ctrl from the keyboard then mouse left click the mav Geek layer.


Then select the MOVE tool from the toolbox.


After selecting the MOVE tool follow the guide below.

Next:
The Result, see below.And now select the Gradient tool. Hold mouse left button to see the selection if necessary.

After selecting the Gradient tool from the toolbox, follow the following steps.


After that a menu will appear,


After that, follow the next step.
Press Ctrl + D, a keyboard shortcut to deselect the marquee.
And now you will see result below, almost done.
Okay now we will finalize this one, the image result from above. Follow the final step.

From the Layers window select the layer named Layer 1 and follows the setting below.


And were done, see the final result below.

Thank you for your time reading, for following this tutorial. Promise more to come.

This tutorial is very simple to follow, just follow some simple steps and you’re done.

Let’s start, first you need to open Adobe Photoshop any version. For this tutorial I will use Adobe Photoshop CS4. After opening Adobe Photoshop create a new project, its easy go to the menu then choose File -> New or you can use a keyboard shortcut Ctrl + N. There’s a new window will appear just click OK button.

Next follow the instructions,


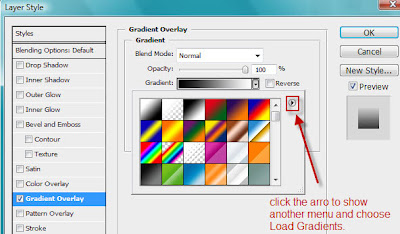
Then go to the menu and choose Layer -> Layer Style -> Gradients Overlay, and new window will appear (Layer Style Window).


After you select the Load Gradients on the above image a new window will appear, The Load window the window will allow you to browse the gradient file you need to load, or the gradient file from your hard drive. After selecting a gradient file and click ok. Then you’re done.


Just in case you need a gradient file, you can download it below.

http://matvinculado.blogspot.com/2009/05/beautiful-web-20-gradients-for-adobe.html


Web 2.0 Gradients for Adobe Photoshop (All versions supported). Para ni sa inyo ni, para mahimo mong mas productive sa photoshop unta makatabang ni ninyo og sakto. I hope kabalo na mo mogamit ani og pag butang or pag settings sa photoshop nga software.

E download n lang ninyo, e click lang ang link sa ilamom and e unrar lang, then input the password.

Download Link 1
or

Password: www.mavgeek.info

Just in case na dili ka kabalo mag set aning gradient. Naa ang guide diri sa link sa ilalom
http://matvinculado.blogspot.com/2009/05/how-to-setup-adobe-photoshop-gradients.html

Enjoy for your new gradients.
Note: mav Geek’s does not store or upload file to this website. We upload files to other file sharing website such as Rapidshare.com, Have a nice stay here.

mav Geek Administrator

For you to earn

mav Geek

mav Geek
What is mav Geek?

Ads

Ads
email: matvinculado@yahoo.com

email: matvinculado@yahoo.com

email: matvinculado@yahoo.com

email: matvinculado@yahoo.com

Best Antivirus

Recent Posts

Comments

Mobile Antivirus

Site Statistics by ALEXA

Sponsors

Help us grow