

 This tutorial will gives you an idea how to make web 2.0 text design. This is so easy to create from the scratch hope you will enjoy this tutorial ok let’s start the tutorial by the following step by step guide.
Note: I used Adobe Photoshop CS4, and it’s ok to use other version of Adobe Photoshop, and after opening the Adobe Photoshop hit the keyboard letter D to restore or reset the Photoshop defaults.
First Open Adobe Photoshop from your computer. Then click File -> and select New (or you can use keyboard shortcut Ctrl+N), and then a new window will appear, from the new window set the width and the height for this tutorial, set the height 500 pixels and width for 500 pixels. See image below.

Then click OK button.
The second step, select the TYPE tool from the Tools menu.
The second step, select the TYPE tool from the Tools menu.

After selecting the Type tool from the toolbox, click to the white space or to the work space of the Adobe Photoshop then write the desire text you want. Just for example I will write mav Geek.
Next go to menu and select Layer -> Layer Style -> Gradient Overlay.


Then new window will appear the Layer Style window.


Then click the Gradient box the box with the black to the white color. And a new window will appear the Gradient Editor window.
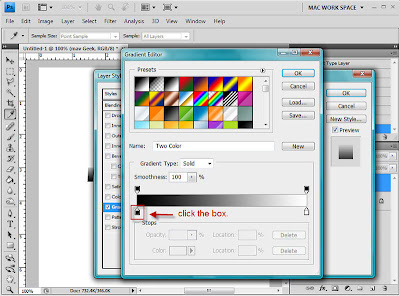
Then follow the following settings from the image below:


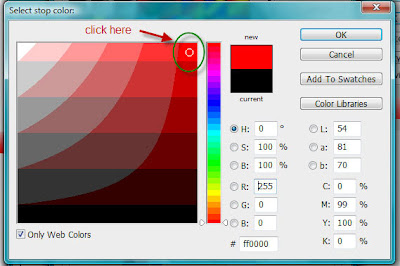
Make sure you see the small white circle inside the red scope. Then click ok button.
Next:


And now click OK button then you will see the result of the Gradient Editor window.

Next click OK button and make sure will not click the OK button of the Layer Style window, see below and follow the instructions.


And then click OK button of the Layer Style window. See below the result
 WOW! Looks great, almost done for this tutorial. Okay let’s continue.
Press the letter D in the keyboard, and now create a new layer, Go to the menu and choose Layer -> New -> Layer or you can do a keyboard shortcut Shift + Ctrl + N.

 Make sure the new layer is selected, Highlighted with the color blue. And then hold Ctrl from the keyboard then mouse left click the mav Geek layer.

Then select the MOVE tool from the toolbox.

After selecting the MOVE tool follow the guide below.


Then follow the following settings from the image below:


Make sure you see the small white circle inside the red scope. Then click ok button.
Next:


And now click OK button then you will see the result of the Gradient Editor window.

Next click OK button and make sure will not click the OK button of the Layer Style window, see below and follow the instructions.


And then click OK button of the Layer Style window. See below the result
 WOW! Looks great, almost done for this tutorial. Okay let’s continue.
Press the letter D in the keyboard, and now create a new layer, Go to the menu and choose Layer -> New -> Layer or you can do a keyboard shortcut Shift + Ctrl + N.

 Make sure the new layer is selected, Highlighted with the color blue. And then hold Ctrl from the keyboard then mouse left click the mav Geek layer.
Then select the MOVE tool from the toolbox.

After selecting the MOVE tool follow the guide below.

Next:  The Result, see below.
 And now select the Gradient tool. Hold mouse left button to see the selection if necessary.

After selecting the Gradient tool from the toolbox, follow the following steps.

After that a menu will appear,

After that, follow the next step. Press Ctrl + D, a keyboard shortcut to deselect the marquee.
And now you will see result below, almost done.
 Okay now we will finalize this one, the image result from above. Follow the final step.
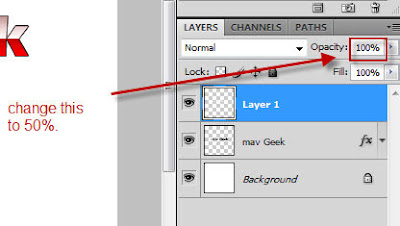
From the Layers window select the layer named Layer 1 and follows the setting below.
And were done, see the final result below.

 The Result, see below.
 And now select the Gradient tool. Hold mouse left button to see the selection if necessary.
After selecting the Gradient tool from the toolbox, follow the following steps.

After that a menu will appear,

After that, follow the next step.
 Press Ctrl + D, a keyboard shortcut to deselect the marquee.
And now you will see result below, almost done.
 Okay now we will finalize this one, the image result from above. Follow the final step.
From the Layers window select the layer named Layer 1 and follows the setting below.

And were done, see the final result below.

Thank you for your time reading, for following this tutorial. Promise more to come.


Post a Comment